


How to Install a CS2 Server on AlmaLinux
In this guide, I’ll show you how to install a Counter-Strike 2 (CS2) server on an AlmaLinux VPS.
1. Accessing AlmaLinux
Log in to your server using an SSH connection.
Here’s how you can connect to your server via SSH.
Once you’re logged in, update the system with this command:
sudo dnf update -y
2. Creating a New User
Add a new user that will run the CS2 server:
sudo adduser steam
Then set a password for that user:
sudo passwd steam
Give the user permission to use sudo commands:
sudo usermod -aG wheel steam
Now you can switch to that user with:
su - steam
3. Installing SteamCMD and Required Packages
Install the necessary dependencies:
sudo dnf install glibc.i686 -y
sudo dnf install gcc libstdc++.i686 wget tar -y
Create a new directory for SteamCMD and go there:
mkdir -p ~/steamcmd
cd ~/steamcmd
Download and extract SteamCMD:
wget https://steamcdn-a.akamaihd.net/client/installer/steamcmd_linux.tar.gz
tar -xvzf steamcmd_linux.tar.gz
Run SteamCMD:
./steamcmd.sh
Set the directory where CS2 will be installed (it will be created automatically if it doesn’t exist):
force_install_dir /home/steam/cs2-ds
Log in anonymously:
login anonymous
Install CS2 (this may take a while, around 60GB download):
app_update 730 validate
When you see Success! App '730' fully installed. you can exit SteamCMD with quit:
Now, we need to install another component required to run the CS2 server, in a different directory.
Start SteamCMD again:
./steamcmd.sh
Set the installation directory:
force_install_dir /home/steam/sniper
Log in again:
login anonymous
Install the Sniper environment (required for running the CS2 server):
app_update 1628350 validateWhen you see Success! App '1628350' fully installed. you can exit SteamCMD with quit: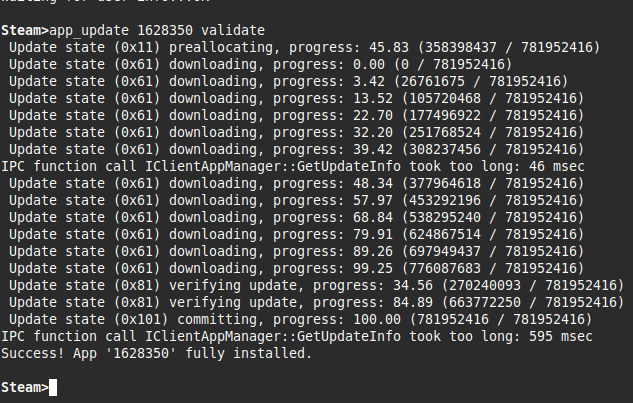
Return to your home directory:
cd
List the contents to verify:
ls
The folder should look something like this:
4. Firewall Setup
Install and enable the firewall:
sudo dnf install firewalld
sudo systemctl start firewalld
sudo systemctl enable firewalld
Open the required ports:
sudo firewall-cmd --permanent --add-port=27016/udp
sudo firewall-cmd --permanent --add-port=27016/tcp
sudo firewall-cmd --reload
5. Moving the steamclient.so File
To make the server work, you need to move the steamclient.so file into the .steam/sdk64 folder.
Create the folder:
mkdir -p ~/.steam/sdk64
Copy the file there:
cp /home/steam/steamcmd/linux64/steamclient.so ~/.steam/sdk64/
Verify the file was copied correctly:
ls -l ~/.steam/sdk64/steamclient.so
You should see it listed there.
6. GSLT (Game Server Login Token)
You need a Steam-provided token (GSLT) to make your server accessible.
Log in with your Steam account (click the Login button in the top right corner).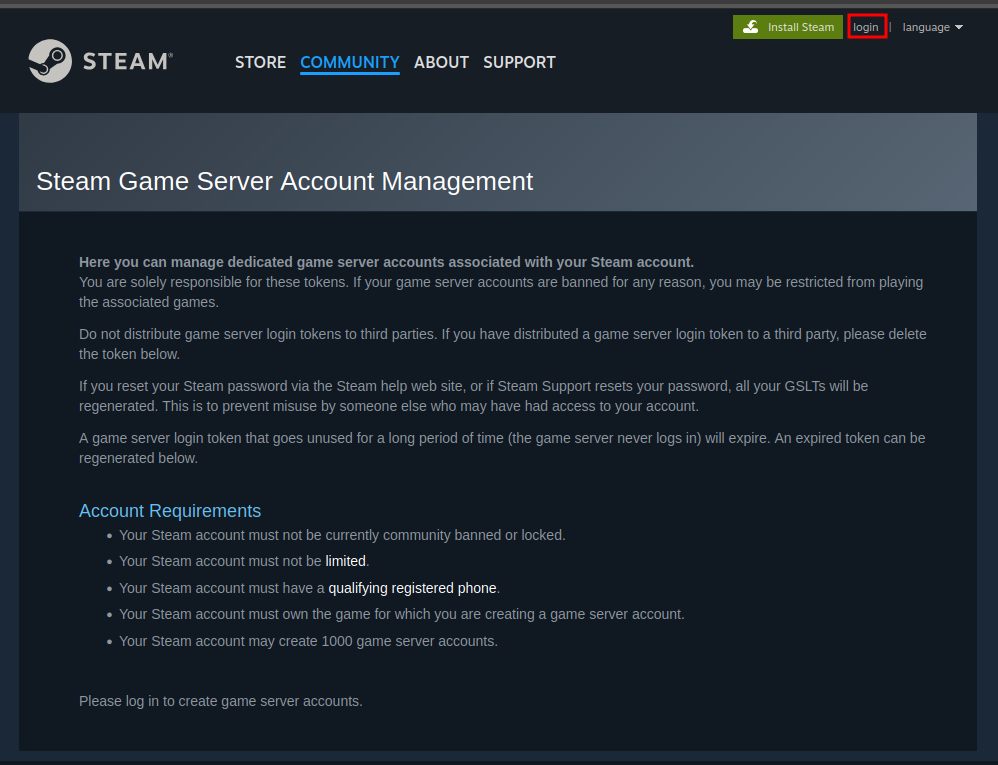
Under “Create a new game server account”, enter:
-
App ID: 730 (for CS2)
-
Memo: any name you like
Then click Create.
You’ll need this code later.
7. Starting the Server
Start the server with this command (we’ll create a start script later to simplify this). Remember to replace YOUR_GSLT_CODE with your own token.
~/sniper/run -- ~/cs2-ds/game/cs2.sh -dedicated -game csgo -console -usercon -tickrate 128 -port 27016 +game_type 0 +game_mode 1 +map de_dust2 +mapgroup mg_active +sv_setsteamaccount YOUR_GSLT_CODE
You can open a second SSH session to check if the server is running. Install nmap:
sudo dnf install nmap -y
Check if the port is open:
sudo nmap -sU -p 27016 Sinun_palvelimesi_IPYour server IP is the same one you used for the SSH connection.
If the output shows STATE : OPEN your server is online.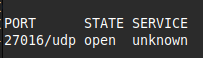
To stop the server:
pkill -f 'cs2.sh|/cs2|pressure-vessel'
8. Creating a Server Start Script
Now that the server works, let’s make a script to start it more easily.
Go to the CS2 directory:
cd ~/cs2-ds
Install Nano (a text editor):
sudo dnf install nano -y
Create a new file:
nano startcs2.sh
Paste the following content (remember to replace YOUR_GSLT_CODE):
#!/bin/bash
#
# CS2 Dedicated Server Launcher
#

# --- Fix locale issues ---
export LANG=en_US.UTF-8
export LC_ALL=en_US.UTF-8

# --- Ensure Steam libraries are visible ---
export LD_LIBRARY_PATH="$HOME/.steam/sdk64:$LD_LIBRARY_PATH"

# --- Run the server ---
echo "Starting Counter-Strike 2 Dedicated Server..."
$HOME/sniper/run -- $HOME/cs2-ds/game/cs2.sh \
  -dedicated -game csgo -console -usercon -tickrate 128 \
  -port 27016 \
  +game_type 0 +game_mode 1 +map de_dust2 +mapgroup mg_active \
  +sv_setsteamaccount YOUR_GSLT_CODE) \
  2>/dev/null | grep -v "(null)"

# --- Keep window open if something crashes ---
echo "Server stopped. Press Enter to exit."
read
Save and exit Nano (CTRL+S, then CTRL+X).
Make the script executable:
chmod +x startcs2.sh
Now you can start the server (while in the cs2-ds directory):
./startcs2.sh
You can stop the server the same way as before.
9. Connecting to the CS2 Server
To connect, open CS2 and enable the developer console in your game settings.
Assign a key for the console (e.g., ~).
Then press that key to open the console and type:
connect IP-Osoite:Portti
example. connect 109.204.237.123:27016
Use the same IP you used for SSH (your VPS IP), and the port 27016.
Now your CS2 server is up and running, and you can join it directly from the game!


