


Pterodactyl is an open-source Linux-based game server management panel.
It allows you to easily manage and run game servers through a web interface. It uses Docker containers to isolate servers and supports a wide range of games.
In this guide, I will show you how to install the Pterodactyl panel. The Pterodactyl panel is designed to run on your own web server. You need to have administrator rights to your server in order to install and use this panel.
At the beginning there is a download of requirements for Ubuntu Linux, but if you are on AlmaLinux or something similar you can scroll down a bit to find the correct commands.
1. First update your packages and repository.
sudo apt update2. Next, we will install important requirements for the server:
Add the "add-apt-repository" command
apt -y install software-properties-common curl apt-transport-https ca-certificates gnupgAdd additional PHP, Redis, and MariaDB repositories
LC_ALL=C.UTF-8 add-apt-repository -y ppa:ondrej/phpAdd the official Redis APT repository
curl -fsSL https://packages.redis.io/gpg | sudo gpg --dearmor -o /usr/share/keyrings/redis-archive-keyring.gpg
echo "deb [signed-by=/usr/share/keyrings/redis-archive-keyring.gpg] https://packages.redis.io/deb $(lsb_release -cs) main" | sudo tee /etc/apt/sources.list.d/redis.list
Skip MariaDB repo installation script if using Ubuntu 22.04
curl -sS https://downloads.mariadb.com/MariaDB/mariadb_repo_setup | sudo bashUpdate
apt updateInstall requirements
apt -y install php8.3 php8.3-{common,cli,gd,mysql,mbstring,bcmath,xml,fpm,curl,zip} mariadb-server nginx tar unzip git redis-serverUse these if you have CentOS, Rocky Linux, AlmaLinux or Fedora Server
Update your server
sudo dnf update -yInstall EPEL and Remi repositories
sudo dnf install -y epel-releaseAdd PHP repositories (Enterprise Linux 8)
(if you have almalinux 9.3, change "remi-release-8.rpm" from 8 -> 9 to get the correct data)
sudo dnf install -y https://rpms.remirepo.net/enterprise/remi-release-8.rpmEnable PHP 8.3
sudo dnf module reset php
sudo dnf module enable php:remi-8.3 -y
sudo dnf install php-process -y
sudo dnf install php83-php-process -y
Install dependencies
sudo dnf install -y php php-{common,cli,gd,mysql,mbstring,bcmath,xml,fpm,curl,zip} mariadb mariadb-server nginx redis zip unzip tarStart and enable services
sudo systemctl enable --now mariadb nginx redisInstall firewall
sudo dnf install firewalld -y
sudo systemctl enable --now firewalld
Configure firewall (This will open ports 80 and 443 so you can the Pterodactyl panel)
sudo firewall-cmd --add-service=http --permanent
sudo firewall-cmd --add-service=https --permanent
sudo firewall-cmd --reload
Install Nano (Nano is a text file editing tool)
sudo dnf install nano -y
3. Installing Composer
Composer is a dependency management tool for PHP that allows us to easily deliver everything needed to use the panel.
curl -sS https://getcomposer.org/installer | sudo php -- --install-dir=/usr/local/bin --filename=composer
4. Installing files
First we will create a new folder for Pterodactyl
mkdir -p /var/www/pterodactyl
cd /var/www/pterodactyl
Once you have created the directory and are inside it, we will download and extract the files using the curl tool.
curl -Lo panel.tar.gz https://github.com/pterodactyl/panel/releases/latest/download/panel.tar.gz
tar -xzvf panel.tar.gz
chmod -R 755 storage/* bootstrap/cache/
5. Creating a database
Now that all the important files have been downloaded, we need to configure some panel features. Let's first create a database for the panel:
mysql -u root -p
Remember to replace 'yourPassword' with your actual password!!
CREATE USER 'pterodactyl'@'127.0.0.1' IDENTIFIED BY 'yourPassword';
CREATE DATABASE panel;
GRANT ALL PRIVILEGES ON panel.* TO 'pterodactyl'@'127.0.0.1' WITH GRANT OPTION;
exit
To exit the MySQL interface, type "exit" and press ENTER. Then, we will copy the default environment configuration file, install important requirements, and generate a new application encryption key.
cp .env.example .env
composer install --no-dev --optimize-autoloader
Run this command only when installing Pterodactyl for the first time and you don't have any databases created
php artisan key:generate --force6. Environment configuration
The Pterodactyl environment can be easily configured using a few CLI commands:
php artisan p:environment:setupIn the first two fields you can enter your email and either your own site or VPS servers IP address. This will allow you to access the Pterodactyl panel later.
(You can press Enter in the other fields if you do not want to change the default settings)
(If you use your own page = domain name, it is recommended to have an SSL certificate, which you can do with certbot: instructions here)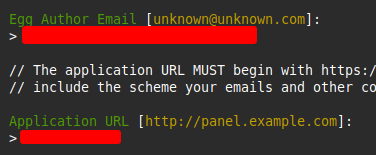
php artisan p:environment:databaseYou can press Enter in all fields except for the Database Password field where you enter the password you set in Step 5.
7. Database configuration
Now we need to configure all the basic information of the panel in the database you previously created:
php artisan migrate --seed --force
This command will set up the database tables and then add all the Nests & Eggs that Pterodactyl uses.
8. Creating an admin user
Next, we need to create a user with administrator privileges. Set the user details using this command:
php artisan p:user:make9. Giving privileges
The final step of the installation is to set the correct permissions for the panel files so that the web server can access them properly.
This is for Ubuntu
If you are using Apache or Nginx:
chown -R www-data:www-data /var/www/pterodactyl/*
These two are for AlmaLinux and others like it
If you are using Nginx:
chown -R nginx:nginx /var/www/pterodactyl/*If you are using Apache:
chown -R apache:apache /var/www/pterodactyl/*10. Crontab settings
Crontab is only available on Ubuntu Linux, so you can skip this section if you are not on Ubuntu or something similar.
The first thing we need to do is create a new cron job that runs every minute to handle certain Pterodactyl tasks, such as session cleaning and dispatching scheduled tasks.
Open the cron editor using the command: "sudo crontab -e" and add the following line at the end:
* * * * * php /var/www/pterodactyl/artisan schedule:run >> /dev/null 2>&111. Creating the Queue Worker file
Create a file named "pteroq.service" in the directory "/etc/systemd/system" with the following content:
cd /etc/systemd/system
sudo nano pteroq.service
If you are on almalinux then change After=redis-server.service -> After=redis.service
In this guide, if you are using almalinux or something similar, set user and group = nginx.
[Unit]
Description=Pterodactyl Queue Worker
After=redis-server.service

[Service]
User=www-data
Group=www-data
Restart=always
ExecStart=/usr/bin/php /var/www/pterodactyl/artisan queue:work --queue=high,standard,low --sleep=3 --tries=3
StartLimitInterval=180
StartLimitBurst=30
RestartSec=5s

[Install]
WantedBy=multi-user.target
If you are using Redis, run these commands to ensure that Redis starts automatically when the server boots and to enable Pterodactyl with the command below:
sudo systemctl enable --now redis-serverWith Almalinux
sudo systemctl enable --now redissudo systemctl enable --now pteroq.service
11.5. Almalinux 9 additional configuration
cd /etc/php-fpm.d
sudo nano www-pterodactyl.conf
copy the text below there, save it and then you can exit
[pterodactyl]
user = nginx
group = nginx

listen = /var/run/php-fpm/pterodactyl.sock
listen.owner = nginx
listen.group = nginx
listen.mode = 0750

pm = ondemand
pm.max_children = 9
pm.process_idle_timeout = 10s
pm.max_requests = 200
Then turn on php-fpm with this command:
sudo systemctl enable --now php-fpm
# Use this code to find what you need to put in part 12 on the line which has
# fastcgi_pass unix:;
grep -R "listen =" /etc/php-fpm.d/*.conf

# You should see something like this where you take /var/run/php-fpm/pterodactyl.sock
/etc/php-fpm.d/www-pterodactyl.conf:listen = /var/run/php-fpm/pterodactyl.sock

# Which you put in like this
# fastcgi_pass unix:/var/run/php-fpm/pterodactyl.sock;
12. Web server configuration
First delete the default Nginx configuration
rm /etc/nginx/sites-enabled/defaultNow paste the contents of the file below and replace <domain> with your domain name used in the file called pterodactyl.conf and place the file in the folder
cd /etc/nginx/sites-available
sudo nano pterodactyl.conf
With Almalinux you can find the right folder with
cd /etc/nginx/conf.d
sudo nano pterodactyl.conf
If you are on Almalinux change fastcgi_pass unix:/run/php/php8.3-fpm.sock; --> fastcgi_pass unix:/var/run/php-fpm/pterodactyl.sock;
server {
    # Replace <domain> with your actual domain or IP address
    listen 80;
    server_name <domain>;

    root /var/www/pterodactyl/public;
    index index.html index.htm index.php;
    charset utf-8;

    location / {
        try_files $uri $uri/ /index.php?$query_string;
    }

    location = /favicon.ico { access_log off; log_not_found off; }
    location = /robots.txt  { access_log off; log_not_found off; }

    access_log off;
    error_log  /var/log/nginx/pterodactyl.app-error.log error;

    # allow larger file uploads and longer script runtimes
    client_max_body_size 100m;
    client_body_timeout 120s;

    sendfile off;

    location ~ \.php$ {
        fastcgi_split_path_info ^(.+\.php)(/.+)$;
        fastcgi_pass unix:/run/php/php8.1-fpm.sock;
        fastcgi_index index.php;
        include fastcgi_params;
        fastcgi_param PHP_VALUE "upload_max_filesize = 100M \n post_max_size=100M";
        fastcgi_param SCRIPT_FILENAME $document_root$fastcgi_script_name;
        fastcgi_param HTTP_PROXY "";
        fastcgi_intercept_errors off;
        fastcgi_buffer_size 16k;
        fastcgi_buffers 4 16k;
        fastcgi_connect_timeout 300;
        fastcgi_send_timeout 300;
        fastcgi_read_timeout 300;
    }

    location ~ /\.ht {
        deny all;
    }
}
Enable the configuration using this command:
sudo ln -s /etc/nginx/sites-available/pterodactyl.conf /etc/nginx/sites-enabled/pterodactyl.conf
After that restart Nginx:
sudo systemctl restart nginx
To get Almalinux 9 configurations working, enter these commands:
sudo -u nginx php /var/www/pterodactyl/artisan config:clear
sudo -u nginx php /var/www/pterodactyl/artisan config:cache
sudo systemctl restart php-fpm
13. Getting into the panel
You can access the panel by entering the domain or IP address you entered in step 6 into your browser.
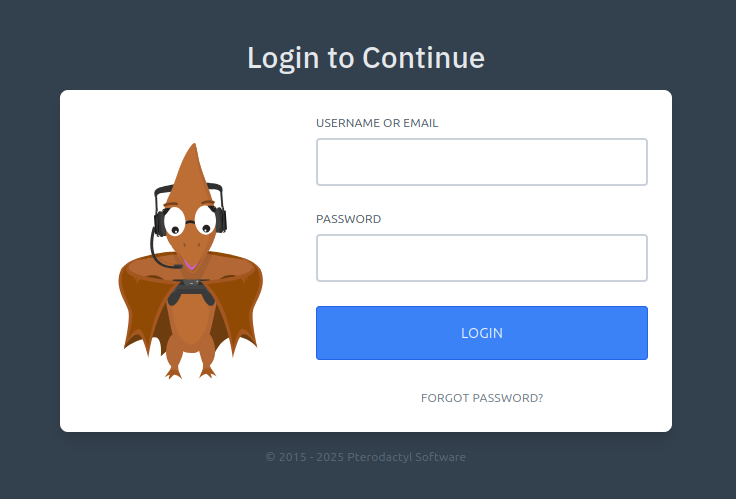
There you will enter the username and password you created in step 8.
14. Wings requirements installation
Installing Docker
curl -sSL https://get.docker.com/ | CHANNEL=stable bashThis will start Docker on startup
sudo systemctl enable --now dockerUse these if you have CentOS, Rocky Linux, AlmaLinux or Fedora Server
Install the required packages
sudo dnf install -y dnf-utils device-mapper-persistent-data lvm2
Add a Docker repository
sudo dnf config-manager --add-repo=https://download.docker.com/linux/centos/docker-ce.repoInstall Docker
sudo dnf install -y docker-ce docker-ce-cli containerd.ioThis will start Docker on startup
sudo systemctl enable --now dockerConfigure Firewall (This will open various ports and make sure the Pterodactyl user can pass through the firewall)
firewall-cmd --add-port 8080/tcp --permanent
firewall-cmd --add-port 2022/tcp --permanent
firewall-cmd --permanent --zone=trusted --change-interface=pterodactyl0
firewall-cmd --zone=trusted --add-masquerade --permanent
firewall-cmd --reload
After you've done either of those you need to enable swap
sudo nano /etc/default/grub
Add swapaccount=1 to the GRUB_CMDLINE_LINUX or something similar shown in the image, as shown in the image.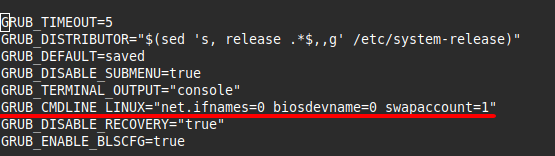
After that, do
sudo update-grub
sudo reboot
If you are on Almalinux you should use
sudo grub2-mkconfig -o /boot/grub2/grub.cfg
15. Install Wings
Use these commands to install Wings.
sudo mkdir -p /etc/pterodactyl
curl -L -o /usr/local/bin/wings "https://github.com/pterodactyl/wings/releases/latest/download/wings_linux_$([[ "$(uname -m)" == "x86_64" ]] && echo "amd64" || echo "arm64")"
sudo chmod u+x /usr/local/bin/wings
16. Configuration
Go to the admin area in the panel
There, go to the locations section in the sidebar on the left.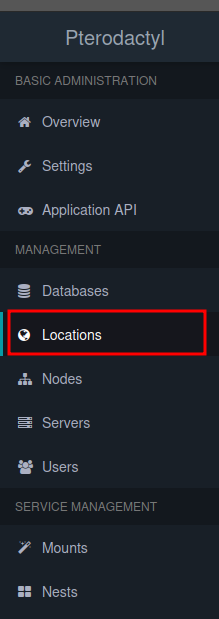
There, click the create new button in the upper right corner.
There you add your region to the short code section according to the template shown there.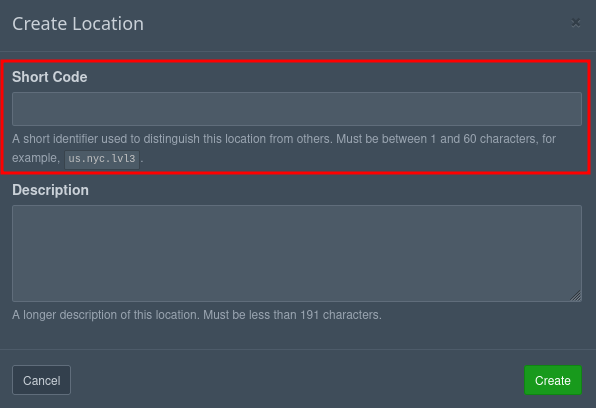
Then go to Nodes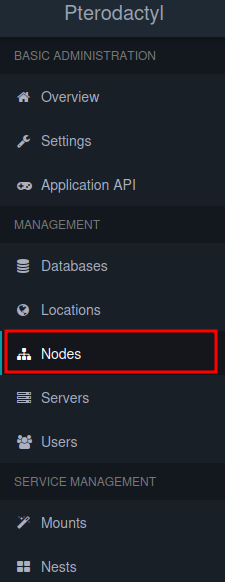
From there, click the Create New button.
Then you will see a page like this where you need to put your site/ip address and configure how much space you want to put on the node and other things like that.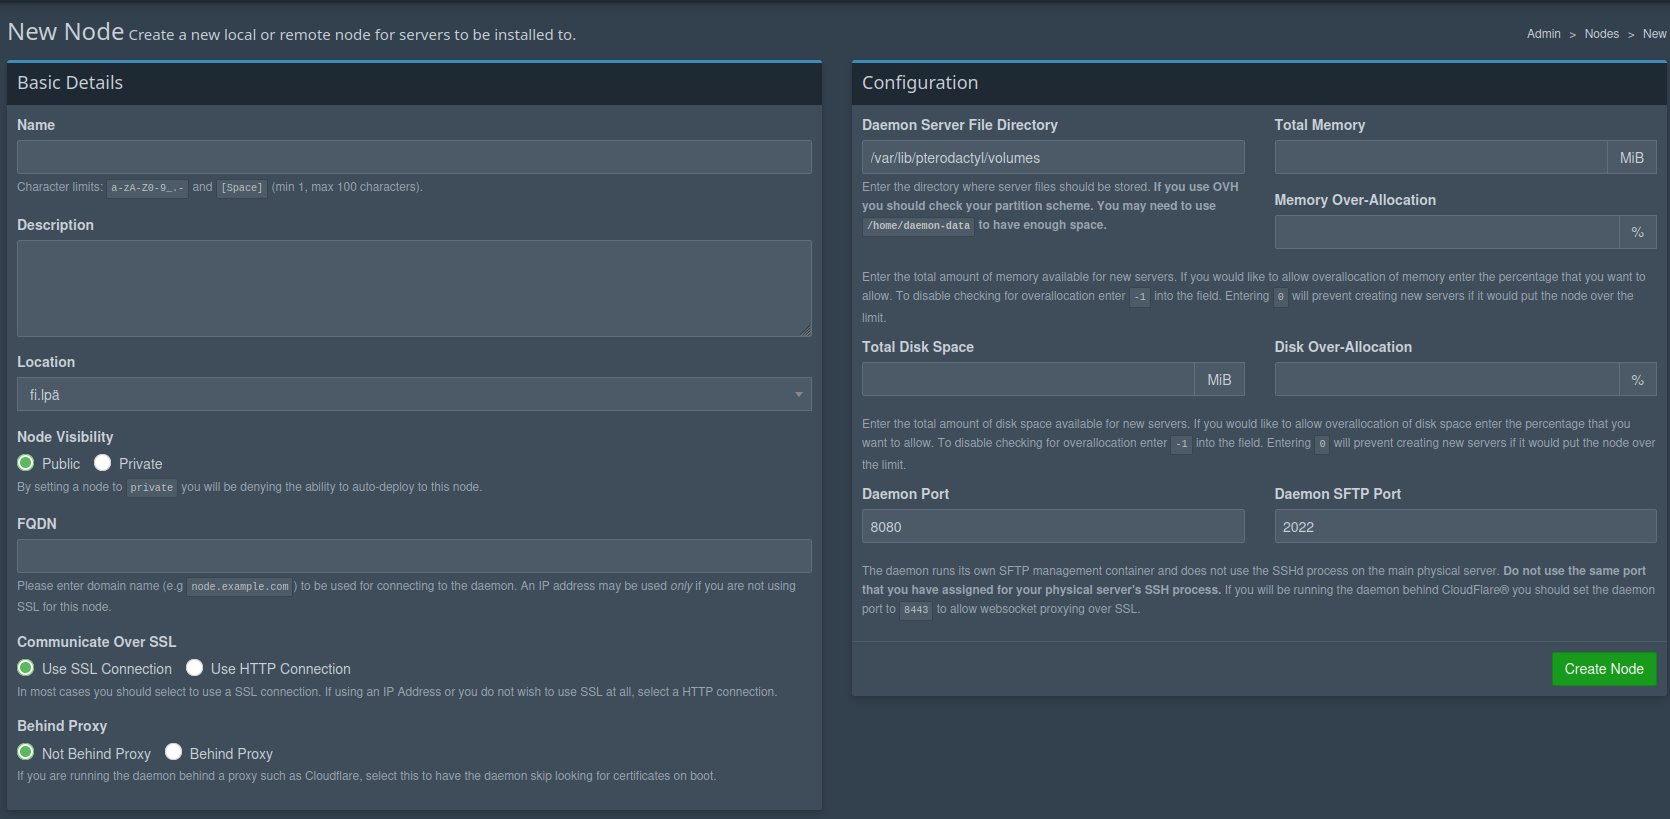
Then you can open the node by clicking on its name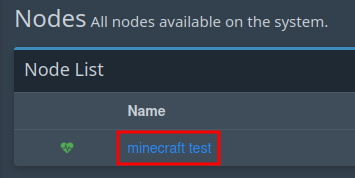
There, go to the Configuration page and copy the code snippet there.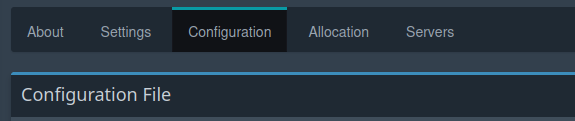
Then use these commands to go to the config.yml file and add the snippet copied from the page there.
cd /etc/pterodactyl
sudo nano config.yml
17. Start Wings
You can start Wings with this command
sudo wings --debugWith Almalinux you have to do a little more to get it working
Download the necessary things
sudo dnf install -y curl tar unzip socatMake a folder for Wings and go there
sudo mkdir -p /etc/pterodactyl
cd /etc/pterodactyl
Make sure Wings is downloaded
curl -L https://github.com/pterodactyl/wings/releases/latest/download/wings_linux_amd64 -o wingsDo this to make sure it can boot.
chmod +x wingsAnd then try to launch Wings
sudo ./wings --debugIf you get any error like this, you can try turning off your firewall for a while.
sudo systemctl stop firewalld
sudo systemctl disable firewalld
then you can try to start Wings again and if you can open this without errors then you can close it.
18. Make Wings run in the background
Go to that folder and open the file
cd /etc/systemd/system
sudo nano wings.service
Copy the following into that file and save it.
[Unit]
Description=Pterodactyl Wings Daemon
After=docker.service
Requires=docker.service
PartOf=docker.service

[Service]
User=root
WorkingDirectory=/etc/pterodactyl
LimitNOFILE=4096
PIDFile=/var/run/wings/daemon.pid
ExecStart=/usr/local/bin/wings
Restart=on-failure
StartLimitInterval=180
StartLimitBurst=30
RestartSec=5s

[Install]
WantedBy=multi-user.target
And then you can start Wings with this command
sudo systemctl enable --now wingsIf you previously turned off the firewall, you can turn it back on now.
sudo systemctl enable --now firewalld
19. Node allocation
Go to the Allocation section of the node
In the space on the right, put the server IP and the ports shown in the picture.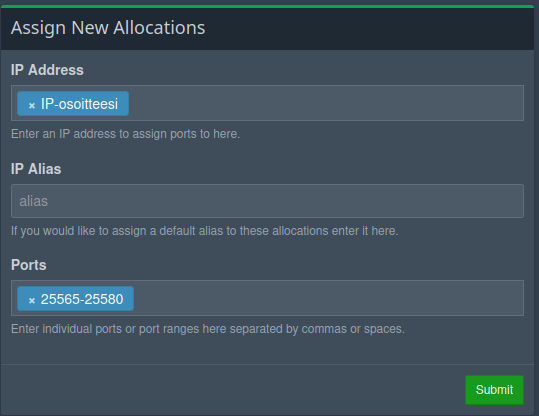
Then once you have added them go to the Servers section on the left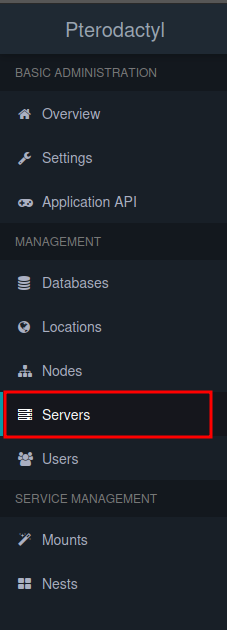
There, press the Create New button.
There you can give the server a name.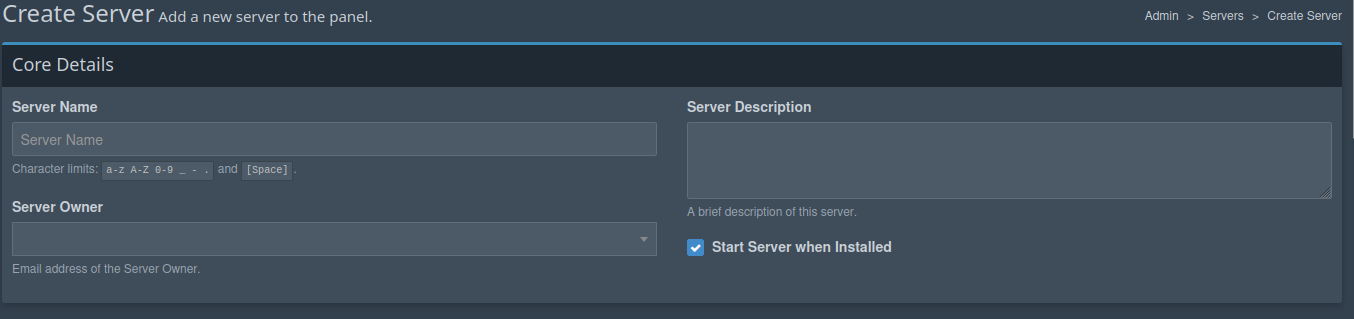
Also decide how much space and other things you want to give it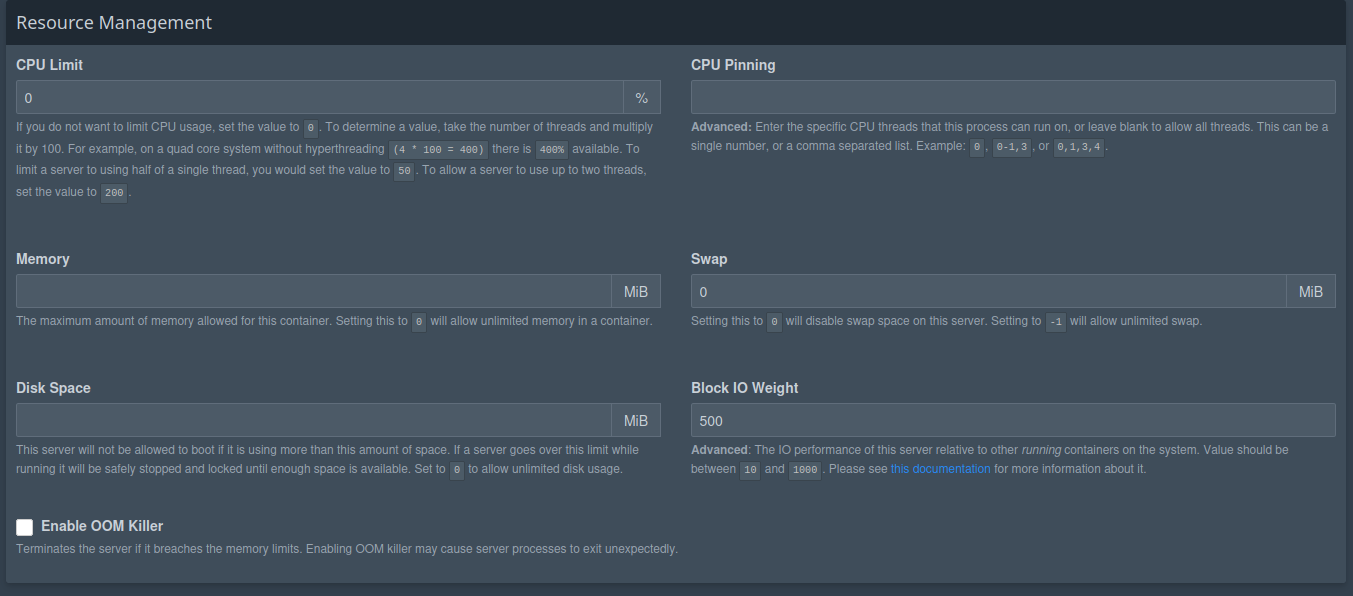
And then you can choose which game you want to make a server for (we're making a Minecraft server here)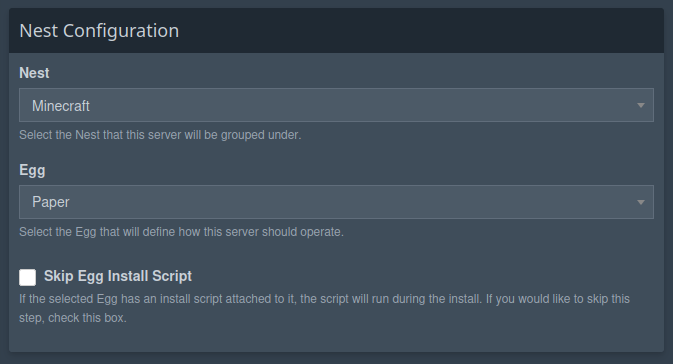
Then you can select the version and then press the Create Server button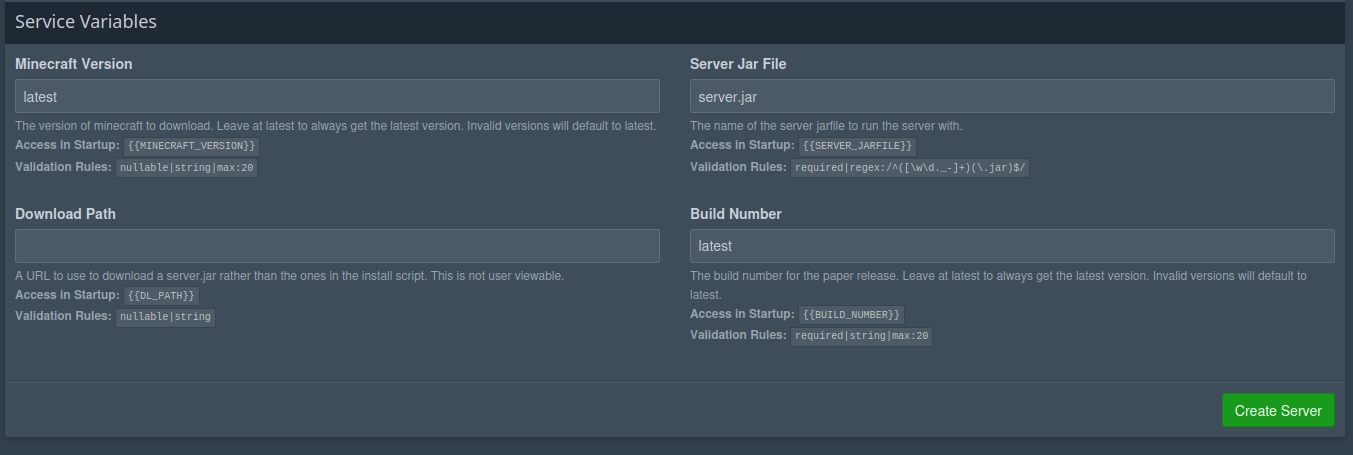
Then you have to wait a moment for the server to start up.
You can try refreshing the page until you see a view like this, from where you can press the button on the right side.
This will take you to a page like this where you can press the start button. You will need the Address below the Start button to access the server in the game.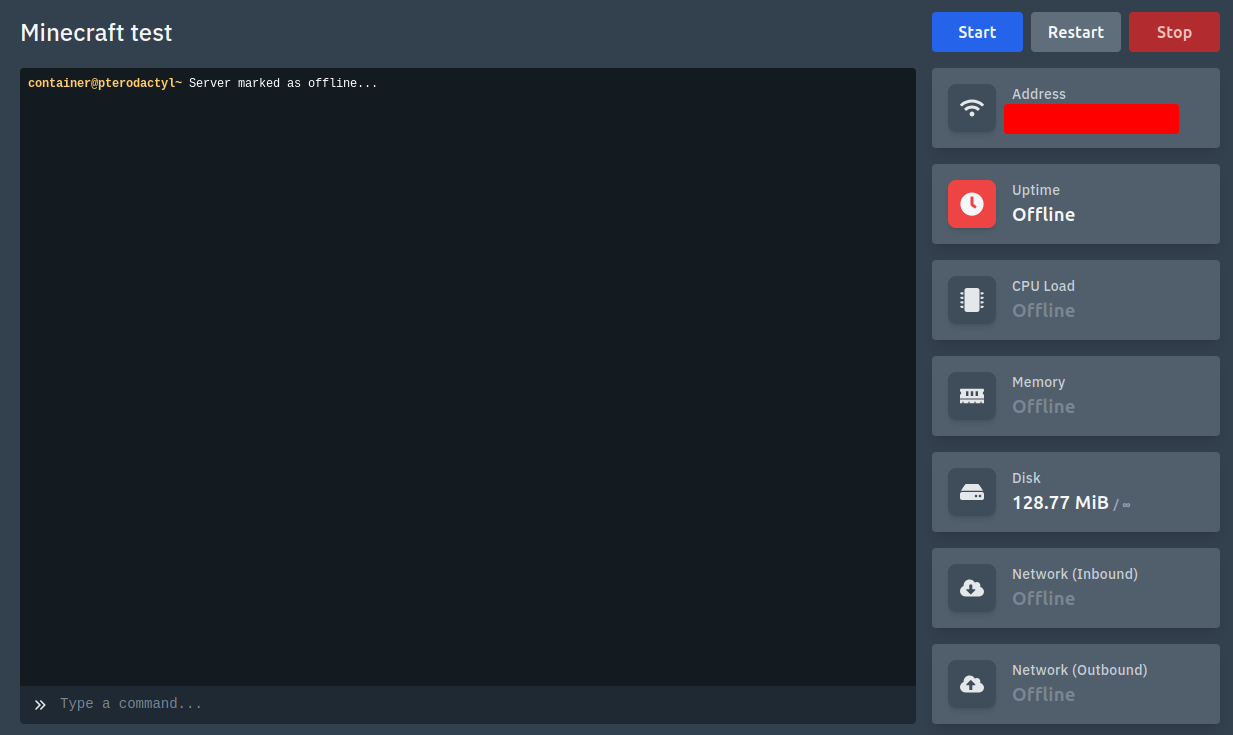
When you start your server for the first time, you will see something like this, where you can press I ACCEPT and then you can go to Minecraft.
In Minecraft you can add your server by pressing the Add Server button.
And by entering the address shown in the panel in the server address field and then pressing Done.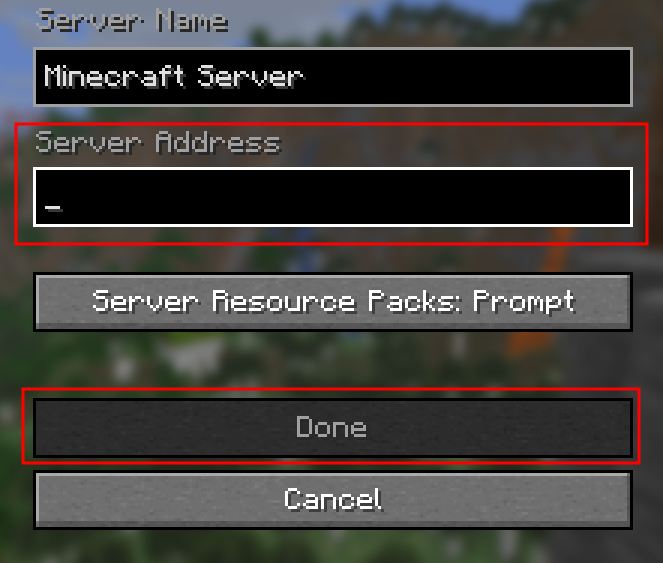
20. Updating the panel
This link contains instructions on how to update the panel to the latest version.
I hope this guide was helpful. If there is any problems please contact us.

